My DIY Concrete Counter Tops
I've been talking about it to my friends on Facebook for months and preparing and taking it step by step. It's finally finished and I'm going to take you through step by step of my project of DIY concrete counter tops. (We'll be tiling the backsplash this weekend, so that will be the next post.)
STEP 1: CONVINCE THE OTHER HALF
My first and most difficult task was convincing my husband that this would be a good idea. I started about 2 months in advance of the time I actually wanted to start shopping for supplies and work on the project. I have learned over the years that if I want to get him excited or simply accepting of one of my crazy ideas, I need to start talking about it months ahead of time. After the initial shock and "no way" response, I finally achieved a successful backing!!
STEP 2: MEASURING AND PLANNING
I decided I wanted 2" thick counter tops and I carefully measured the length, width and where I wanted seams, etc for my counter tops. I bought my sink and fixtures as well, so I would have them when I needed to make the form for my sink cutout.
STEP 3: SHOPPING
This was actually no small task. There is entirely too much information online about concrete and it's difficult to sift through what is actually needed and what is just for sale from money making websites. There are also 5 different acceptable lists of supplies. The list of materials I decided were important for my project and my budget came to this:
- 3/4" Melamine fiberboard (Home Depot)
- 2" wood screws
- Quikrete 5000 (Home Depot)
- Portland cement (without any rocks or sand)
- 2" high density insulation foam (Home Depot).
- High Zirconia Alkali-Resistant Concrete Fibers (
http://www.directcolors.com/). This is basically chopped fiberglass that is added to the cement mixture to add extra strength. I read that it should be 3/4" long to be the most effective. I love this source. They do not charge shipping and they offer good prices and good descriptions.
- GFRC Riteks Super Plasticizer Water Reducer (
http://store.expressions-ltd.com/servlet/-strse-842/gfrc-concrete-water-reducer/Detail)
- Faucet Hole Knockout forms (
http://store.expressions-ltd.com/)
- Concrete form tape (
http://store.expressions-ltd.com/).
- Steel mesh/diamond lathe (Lowes).
- 1/2" rebar (Lowes).
- Wet Sander with diamond sanding pads. (
http://www.amazon.com/Hardin-Variable-Polisher-Concrete-Polishing/dp/B003B1QEB4/ref=sr_1_4?ie=UTF8&qid=1313004494&sr=8-4). I decided to buy one instead of renting for 3 reasons. Mainly, because I couldn't find one in town to rent. I also looked at rental rates for other masonry equipment and it seemed that if I rented one for more than 2 days, I could buy a cheap sander for the same price. The third reason is that I didn't want to feel rushed to get the perfectionist part of the job done in a day or two. We found this cheap one that came with the sanding disks, and it did OK. I may sell it on Craigslist or hold on to it if I decide to do a bathroom counter top later. I would say if one intends to do a lot of wet sanding, you might want to invest in a better quality one.
- DCI Lithium based sealer/hardener (
http://www.directcolors.com/). I chose to use this as a primary sealer because it seals out stains and scents better than the others on the market. I had a bit of a problem getting a nice smooth finish with this sealer. It may have been the humidity level or lack of humidity in the house when I applied it, but it worked nicely on a couple and not so great on others.
- Krystal Kote sealer (
http://www.directcolors.com/). I used this on top of the lithium based sealer to create a glossy surface. Loved this product. It took about a week to fully cure, so I'd recommend doing it before you install.
- 1/2" plywood (Home Depot). This is to put under the counter tops to support them from underneath, but mostly to allow for a smooth surface to push the counter tops in place.
In addition to all this, I also had to make sure i purchased my kitchen sink and faucets before I poured and planned the counters so I made sure I had the right form.
STEP 4: BUILDING THE MELAMINE FORMS
You may wonder why one can't just use basic plywood to build forms to pour counter tops. Well, it's because the melamine offers a nice smooth plastic coating that doesn't soak up any moisture and doesn't stick to the cement when it's done. Building the forms requires patience and precision, but it's fairly straight forward work. I had my side pieces cut at Home Depot, because I don't have the greatest table saw and I wanted to make sure they were the same width. The final width measurements were 2 3/4" wide. 2" for the counter top width and 3/4" for the width of the melamine.
Basically, I pre-drilled the holes where I wanted my screws, and then screwed in the sides to make a form to hold the cement. It took me about 6 hours to do all of them, mostly because I was working alone. When I finally solicited my husband's work, it went a lot faster. There was no science to this. I estimated about every 6-8" along the edges and put 2 screws in the ends to hold it all together.
Pre-drilling the holes
Screwing the sides down
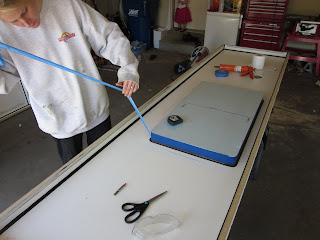
STEP 5: CAULKING
I used two different kinds of caulk and found that the roofing caulk was harder to work with and more sticky than the kitchen/bath caulk, though both were silicone. At the final release, the kitchen/bath caulk worked better too. Either way, use a colored caulk that's not white, so you can easily see it to work the shape with your finger or caulking tool. I found the best way to create the final smooth finish on the caulk was to lick my finger and run a wet finger across the caulk. This way the caulk did not stick to my finger at all and was able to mold easily to the shape I wanted it to be. This was especially useful for the inside corners.
STEP 6: FAUCET AND SINK KNOCKOUTS
I probably could have found scraps of this high density foam on Craigslist for next to nothing, but I didn't have the time to run around town looking for 2" foam. Most of the scraps available were 1.5". It's worth checking at the hardware store to see if they've got scraps they're trashing, though as a 4x8' sheet was almost $40.
Using the sink cutout form that came with my sink (adjusted a bit for my taste), I drew around it with a Sharpie and took it over to my dad's house. Since I am without a jigsaw or a band saw, he cut it out for me with his band saw and did an amazing job. This has to be pretty precise, so I suggest having the right tools. I started out using a serrated knife and quickly decided that it was not going to do the job.
After the foam was cut to measure, I wrapped the whole thing with the form tape I purchased from
http://store.expressions-ltd.com/. This website was where I found the best price. It was still $19, but it was significantly cheaper than nearly $60 at Chengs Concrete. This is necessary to wrap around the foam sink knockout so you have a very smooth edge and so the foam doesn't soak up the moisture of the cement as it's curing. Unfortunately, for most projects, you'll use about 1/20th of the roll, so if you can, you may want to try to sell the remainder on Craigslist or eBay once your projects are complete.
Measured 4 times to be safe, traced and then glued once, I glued it into place using caulk. If you do this, MAKE SURE YOU DO THIS BACKWARDS. You are working upside down, so you have to make sure you are placing your sink opposite of where it will be when you flip the counter ops over. The top of your counter top is the bottom of your form.
I also taped and caulked around the form like I did the corners of the forms to ensure a nice rounded final edge.
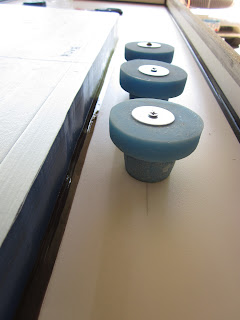
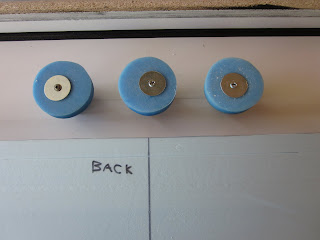
Then I fastened down the faucet knockouts purchased at
http://store.expressions-ltd.com/. I found a 3-pack here for the best price. They come in two sizes and different depths. I bought the larger size which leaves a 1.5 inch knockout for the faucet, handle and soap dispenser, the three things I wanted included in my setup. (I love this website! Just fun to browse for more ideas) After carefully measuring, I fastened them down using extra long screws and washers to hold them in place. Looking at the pictures it looks like they are not centered, but I drilled the holes from the top at the center. The drill didn't go straight down, but it didn't matter since they were centered where they screwed in. (You can get pre-drilled knockouts at Cheng's Concrete, but they're twice the price.)
I decided to go with a standard 8" spread even though my faucet didn't require it. This was just in case we needed to replace it with something different later.
We cut the steel mesh to size for each form and cleaned each form carefully of any dust and debris. We cut the mesh using heavy duty wire cutters. I decided to use this instead of masses amounts of rebar because I was using the Plasticizer and the Fiberglass to add strength. I did end up using rebar around the sink cut out and to reinforce the overhang of my island counter top. Many sources recommend rebar and wire grids. Some others recommend fiberglass sheeting along with chopped fiberglass. Anyway, I thought this would be the most time efficient and cost effective.
I ended up removing the stabilization wires holding the rebar and just laying it in when the time came. It proved to work better.
STEP 8: MIXING THE CEMENT
For our project we needed about 12 80# bags of cement. I decided on the premixed cement, Quikrete 5000 that comes with all the rocks and sand already mixed in. I used Riteks Water Reducer (
http://store.expressions-ltd.com/) to increase the strength of the finished cement to up to PS 7000. To increase strength and cracking resistance, I also added High Zirconia Alkali-Resistant Concrete Fibers (
http://www.directcolors.com/). I love this source. They do not charge shipping and they offer good prices and good descriptions. This is basically chopped fiberglass that is added to the cement mixture to add extra strength. I read that it should be 3/4" long to be the most effective. The mixing ratio is 1-3 lbs. per cubic yard and our total project measured at 0.26 yards. I decided go the higher end and do 3 lbs.
Here was the final recipe per bag of cement:
1 80# bag Quikrete 5000
4.2 oz. GFRC Riteks Super Plasticizer Water Reducer
1 oz. chopped fiberglass (not for top and sides)
The websites and books said to add enough water to make a peanut butter consistency. Thicker than you would normally make for pouring cement for a sidewalk or other project, so that's what I insisted upon, despite some minor disagreement from my free labor for the day...my husband and my dad. Of course it makes it harder to work with, but it makes for a stronger finished product.
STEP 9: POURING THE CEMENT
There definitely needed to be two people for this job, but we had 3. My husband poured the cement in while my dad and I spread it around and placed the mesh. Once each form was filled, we used a 2x4 to level off the top by gently pushing it back and forth across the cement, while my husband took the excess off the top and put it back in the mixer. We were a well oiled machine by the end of the project.
The first pour was made without the fiberglass, since it has a noticeable texture that I didn't want in the top of my counters. After we poured about 3/4" to 1" deep and packed it up the sides, we added fiberglass to the next batch and continued to pour. when there was about 3/4" left to pour, we added rebar along the edges and laid the pre-cut steel mesh across the form. We filled the remainder and leveled off with a 2x4. It became clear that the steel mesh and the rebar should not overlap due to the rocks and sand getting caught up in it and falling through.
After the initial pour without the fiberglass along the bottom and sides of the mold.
Laying the steel mesh after the forms were about 2/3 full.
After the final leveling, we put a piece of melamine over the top and vibrated it with a lawn mower. Not the most high tech tool (and probably not the safest) but it did the job nicely. (This was my friend Todd's suggestion)
It was much easier to work on a higher surface, but we ran out of saw horses and work benches, so we hand to do a couple pours on the ground. We did put some 2x4's under them to be sure we could get our hands under them later to flip them over and unmold them.
STEP 10: UNMOLDING AND FLIPPING THE COUNTERTOPS
After about a week, I unscrewed the molds and gently pryed off the sides of the melamine forms. The caulk was a little sticky, so it took a little bit of working at it, but for the most part it was pretty easy. Then we had a cement flipping party and my husband and 5 of his friends flipped the slabs of cement over so I could start the finishing work. We had to remove the faucet plugs while the counter was on it's side because the bottom was wider than the top, and we had a bit of trouble with this, but in the end, our friend Kurt drilled them out and took care of it while the other guys held the counter carefully. It took about 15 extra minutes. The guys had just come from golfing, so they were in a good mood and didn't seem to mind!
after the unmolding and flipping.
STEP 11: WET SANDING AND SLURRY COAT
I could not find a rental company in the Twin Cities that rented a hand held wet sander, so I went to Amazon.com and found a pretty inexpensive one and I'm glad I did. It made it so I did not have to rush through the process and I could let my slurry coatings set up for as long as I wanted. Though the sanding did not take a terribly long time, probably 5-6 hours total, I was glad to be able to take my time. I paid about $150 for one that came with a set of diamond pads, and with the rental prices, I'm sure I'd have paid about that for 2 days to rent one plus buying the pads.
*The trick to using a wet sander without creating a giant mess and ruining it is to use a tiny trickle of water. Basically you only need enough water to keep the sander from burning your cement. If it starts smoking, add more water. Otherwise, you'll have so much water and you'll short out your machine.
I started with 50 grit because I wanted the aggregate to show through. (If you don't want the sand and rocks to show as much, start with 100 grit.) Then I sanded with 100, then 200 grit. After the initial sanding, many more pinholes were exposed.
Before sanding
After 200 grit sanding (click for larger view)
After that, I did my slurry coat which was a mix of Portland cement mixed with water and a trace amount of water reducer. This was to fill in all of the pin holes that showed up during the sanding process. I found that the thicker it was, the easier it was to press it into the smaller holes. (This was advice from my college friend, Todd, and he was right! It even helped to make sure the holes were dried out completely before trying to fill them, though it also made them harder to see) I let this set for a few days before continuing to wet sand with 400, 800, 1500 then 3000 grit sanding pads.
It was easier to work in with my fingers than a trowel and I decided to lose the gloves after a while because they proved to be a major annoyance. My hands took a bit of a hit, but I tried to think of it as hard core exfoliating.
*I did test this process out, by the way, and found that when I wet sanded it right away after it appeared to dry, the slurry washed out of the holes, so it was important to let it cure for several days before continuing to sand it.
The 3000 is not really all that necessary, but I had it, so I did it. I found that there were a few more pin holes left even after the final sanding, so I filled them in again, let them set for several days and dry sanded them lightly with a dry 3000 grit pad. This proved to be a very effective way of removing the extra cement powder without washing it out of the pin holes at all.
Close-up of the wet-sanded and filled counter top. You can see in the lower right corner, some of the pin-holes appear more matte than the rest. This is wet, by the way.
STEP 12: FINAL CURING AND SEALING
I let the counter tops set for at least 10 days before brushing on a final protective seal coat for installation. I was pretty happy with how they turned out. I used DCI Penetrating Lithium-based Sealer/Hardener(
http://www.directcolors.com/concretesealer/) for my primary sealer. This had to dry overnight per the
instructions on the website. I was pretty happy with the results of this sealer for water resistance, but it didn't have the high sheen I wanted, so I topped it off with the same company's Krystal Kote sealer. I tested it on my sample block for staining and water resistance. Since I do a lot with food coloring, it's important that I don't do permanent damage to my counters once they're installed. I put red, blue and green food coloring right on the counter top, rubbed it in, let it dry for several hours. It wiped off easily with just water, so the sealer delivered!
STEP 13: INSTALLATION
This job required some manpower, so I recruited the help of my husband and 5 men to help carry the load. The smaller counters we we able to ourselves, but the larger two definitely required help. The installation itself took several steps:
A. Remove old counter tops and back splash. Fairly easy job. I let my husband do most of that work. He chiseled away at some of the old glue and wood left behind, I sanded it down to a fairly smooth surface.
B. Cut plywood to size of cupboards. This was fairly straight forward.
C. Finish edges of plywood. For my job, I used iron-on melamine stripping used for closet shelving. Since my cupboards were white anyway, I used white. It also comes in unfinished veneer. My friend Todd used copper edge stripping. You could use stainless steel stripping or whatever you wish. Mine will have some wood filler to fill in any gaps and will eventually disappear.
(trimming the melamine stripping after ironing it on)
(closeup of the plywood on the cupboards as we were placing it)
D. Secure plywood to counters with screws and nails depending on the width of your wood or boards.
E. Place counter top in place to make sure it's where you want it, then lift and secure down with caulk or Liquid Nails. It doesn't take much. They're pretty heavy and won't really move.
F. For the sink, we decided to sandwich the sink between the plywood and the cement. Probably not the contractor recommended way, but it seemed to be the way that worked best for us. The sink is very close to the front of the counter, so we didn't have a lot of extra room to put brackets down. We positioned the counter top (with 4 extra strong guys - thanks Chip, Jon, Kurt and Peter!), traced around the cement sink cut-out, removed the counter top, used a jigsaw to cut out the sink hole, dropped in the sink, and repositioned the counter top with silicone caulk to seal it all in place.
Our friend Kurt cutting out the sink hole for me
Then we just had to hook up the plumbing. Not too tough to do. We've installed lots of faucets in our 10 years of home ownership and this was our second garbage disposal installation, so we're old pros. I don't think anything is leaking under there. If we shut the cupboard doors and don't look, we're good, right?
FINAL NOTES AND OBSERVATIONS:
1. The
GFRC Riteks Super Plasticizer Water Reducer we used was very interesting. It definitely darkened the color of the cement which I love. We added no color, and you can see, the color is a rich charcoal. This was not expected, but I'm happy with how it turned out. It also make working with the cement extremely difficult. It almost instantly hardened it and separated it to a significant extent, making water puddle at the top and the rocks float to the top, making a smooth finish on the "bottom" of the counter virtually impossible. I ended up having to do another mixture of Portland and sand to add to the top after the counters had set up slightly to level them out a bit. I'm not sure if it is meant to be used with pre-mixed cement or if it's meant to be used with custom mixes, but even when I mixed it with straight-up Portland, it set up very quickly. In the end, it was the least expensive option for a mix-in strengthener, but I'd shop around for other options if I were you. I know directcolors and Chengs each has an option, but they both looked rather expensive. Mine turned out great, it just added extra work and I wanted to warn you what you were getting into (should you be so crazy to do the same project!). Here's a picture of the bottom, unfinished and unsanded bottom we poured using the GFRC Riteks. You can see some of the aggregate that congregated at the top of the form.

All in all, I think it was successful. There are a few mistakes, but since they are mine and not a contractor's, they don't bug me all that much. I'm happy with how they turned out and I think it updates my kitchen from the old white formica tops we had.
A very special thanks to the many who helped me! Todd D for his advice, to Jon R for letting me borrow his tools and also for his advice, to my patient husband and my adventurous father for helping me pour the cement, to my mother for her hours of keeping my girls out of the mess, and to the men who helped flip and install: Judd, Joe, John, Aaron, Craig, Peter, Kurt, Chip, and Jon (and to their wives for giving them up for a few hours!)


