Tuesday, December 18, 2012

the sacrifice of artistry

As an artist of sorts and definitely as a perfectionist, it's hard for me to allow my children to take part in my art. Yeah, yeah, children's artwork is beautiful and priceless and no one has any right to criticize it, blah - blah - blah. I do find my children's artwork wonderful for what it is. They're learning and I love that they're learning, but I don't like that I'm losing control of my traditions. Small sacrifice, I suppose...right?

I was married for 10 years before we had kids and I would spend several days during each Christmas season baking delicious sugar cookie cutouts and decorating them impeccably. They were stunning. Snowflakes of aqua and white, stars of blue and yellow, trees of green, mittens and hats of pink and red, each with perfectly placed sprinkles...not too many, but just enough. Each cookie was a canvas on which I painted my masterpiece.

My two daughters love baking almost as much as I do I'm pretty sure they would just as soon take over my kitchen if I would let them. It's fun to watch them learn and be artistic and I love that they are as excited about my craft as I am, but I've had to let go of my perfectionism a little bit. The last couple years, I've let the girls each decorate 5 or 6 cookies each.

This year I let the girls do all of the decorating of the cookies and most of the cutting out.  I think I gave myself 5 or 6. I whipped up a batch of royal frosting and let them do their magic. It almost killed me when I made the decision that I would not bring my annual beautiful cookies to family gatherings this year even though I didn't really have time to make them anyway. It turns out that the girls were just as meticulous as I would have been with frosting and placing sprinkles. I worked with them for a little while and eventually had to walk away so I'd stop telling them what to do.  These are my "favorites:"


Merry Christmas and Happy Baking!

Tuesday, December 4, 2012

my little monkey

After a bit of maternity/postpartum hiatus, I'm back and more exhausted than ever! We celebrated the addition of our son to our family early October and I can describe him in one word.

DELICIOUS.

My sense of fashion and style in my day-wear has been reduced to sweats and pj's. But every time I walk into my baby's room, I can celebrate the style of his nursery decor.  I thought I'd share the details with you.

I know they're overly popular right now and normally I wouldn't go for popular, but I'm a little obsessed with sock monkeys. Pottery barn gave me the idea, but I wasn't a fan of the colors to chose from there...so I went fabric shopping. Until I started sewing it all, I forgot how much I hate sewing bedding and curtains. But for the sake of my baby who doesn't appreciate it at all, I sucked it up and did it.

Here's his room. And, oh yeah, I refinished, painted, or sewed everything you see here except the carpet. Love me or hate me!


Tuesday, September 25, 2012

Orange Dreamsicle Cupcakes


I've discovered a bit of bliss in a natural orange oil I ordered. I've had it in an amazing sweet vinaigrette dressing and other savory items and loved it. But I decided that I had to try it in my cupcakes. I simply added about 1/4 tsp. of the concentrated oil to my favorite white cake recipe and the results were a slice of heaven. Orange cakes with vanilla cream filling. They are topped with my favorite Italian Meringue Frosting. I'm pretty sure that if you like orange, there's nothing quite as delectable as orange dreamsicles in cake form. They're officially added to my menu list for both cake and cupcake orders. You're welcome.


Friday, September 21, 2012

They called him Sharky


Many, many years ago, WAY back in the 2000's, someone (I honestly don't remember who) gave me a book that I instantly loved, but I never did anything with it until this week. The book is called Teach Yourself to Make Soft Toys: Simple Techniques and Patterns for Stuffed Animals.  I have no idea if this book is even in print any more. It includes patterns for reptiles, dinosaurs, a unicorn, spiders, mamas and babies and more.

It has some really cute patterns and and fairly clear directions. (I would say that you'd have to be a semi-experienced sewer to make most of these toys, but some are pretty simple.) I was always amused by the shark pattern and wanted to make it, but had no real reason to do so. I even bought a red zipper that sat in my zipper drawer for over 10 years.

I came across the zipper while I was putting some sewing supplies away and decided it was time to make the shark. It'd be a great little Christmas gift for the baby and I had almost all the fabric. When I started putting the pattern pieces together, I realized that this was not a "little" toy. It is almost 2 1/2 feet long. My youngest daughter has spent the last 2 days playing with it and the little fish that zip into its mouth...and she has asked for a "girl shark" in pink.

It makes me laugh, so I thought I'd share it.


Friday, September 14, 2012

Hooded Baby Towel Tutorial

Yes, those towels with the little frog face are cute, but after the first 6 months, they're about half the size you want.  My oldest daughter is 6 and she's still able to use the same size hooded towels I made for her when she was born.  Sure they might seem a little big for the tiny newborn, but who doesn't like a little extra absorption for those after-bath surprises that newborns throw at us?

It's about as easy as a sewing project can get.

What you'll need:
one full size bath towel
one matching hand towel
matching thread
sewing machine with a needle for heavy fabrics

What you'll do:
1. Pre-wash your towels and dry on medium heat.  This gets the towels clean and the heat drying will help avoid any extra shrinking in the laundry later.

2. Cut the finished edges off of the hand towel on each of the SHORT ENDS, leaving the long edges in tact.

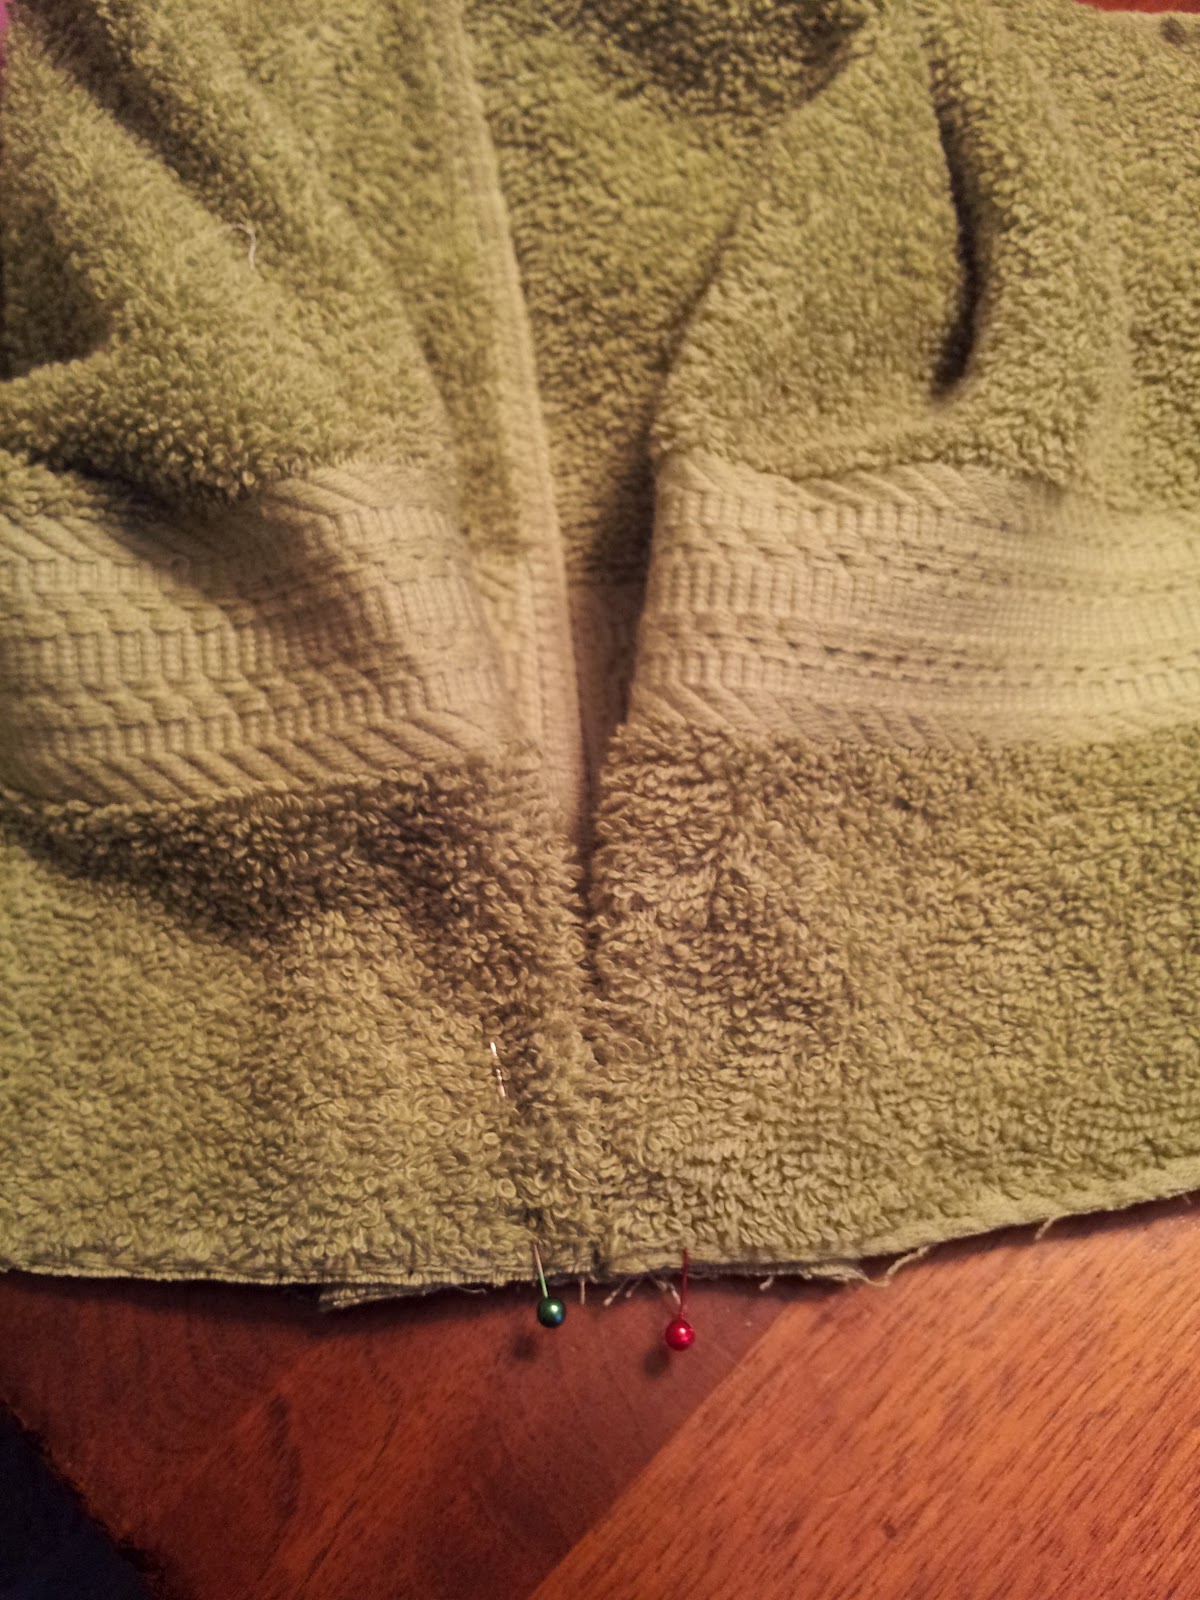
3. Fold the hand towel in half, shorter ends together. Mark the centers of both edges with a water soluable marker or pins. Place one side of the long edge slightly over the other and pin in place.  Starting at the edge (instead of the point), machine baste together toward the point leaving 1-2" free. Top stitch with a zig-zag stitch setting your machine's stitch length short and the width at its widest.  You've just made the back seam of the hood.


4. Turn to inside out with right sides together. Take a tuck across the point of the hood and pin in place, right sides together.  Cut off the point so there is a straight line approx. 5" seam across.  Sew a 1/4" seam allowance and press seam down.  Zig-zag top stitch, encasing the raw edges.


5. On the remaining long edge of the towel (the front edge of the hood), turn under 1 1/2" (wrong sides together).  Pin in place and straight stitch along the edge.

6. Make a double pleat at the raw edge of the bottom of the hood, bringing 1 1/2" toward the center seam from each side. Baste in place.


7. Fold bath towel in half and mark the center.  Lining up the center of the bath towel with the back seam of the hand towel (wrong side of bath towel to right side of hood), pin and baste together as you did for the top seam of the hood (overlapping edges and stitching together).  Lightly press seam toward the hood (so the bath towel lays flat).  Zig-zag top stitch along the seam as before, encasing edges.
NOTE: Unless you're using an industrial sewing machine, be careful when sewing over the pleated section as it could break your needle if you speed over it.


You're done.  If you're an experienced sewer, it'll take you about 30 minutes to an hour.  Feel free to add trims like chenille rickrack or cotton ball fringe to the hood or edges of the towel.

Thursday, September 13, 2012

Island Banana Donuts

We never seem to eat the bananas we buy and I end up with a freezer full of them, unexcited to make more banana muffins or bread, but unwilling to just toss them until it's been several months and they start growing ice crystals.

Yesterday we went to our local apple orchard to get our fill of apple donuts and cider. We also brought home our favorite fall treats, Honeycrisp and Chestnut Crab apples. This morning I was wondering if I could recreate the apple donuts we had. I was googling recipes until I saw a half dozen bananas going bad on the counter. I decided to google banana donuts instead and found a recipe that looked easy, save the gourmet ingredients it called for that I'd have to order online and wait another week for delivery. I tweaked it a bit and came up with this recipe that was amazingly yummy:

Island Bliss Banana Donut Holes
2 cups Krusteaz Buttermilk Pancake Mix (you could probably use whatever is in the house)
2/3 cup milk
1 egg, lightly beaten
2 bananas, mashed
1 tsp. vanilla (opt.)
grape seed oil (or vegetable oil)

Pour oil into a pot, at least 2 inches deep and heat the to medium-hot. Mix remaining ingredients together until batter is sticky. Using a small 1 inch ice cream scoop, drop balls of batter into the hot oil. Turning once, deep fry until a deep golden brown.

Check the first few to make sure the batter is cooked through and adjust cooking time. (mine looked very dark before they cooked through completely)

Remove from oil and place on paper towels to drain.  Roll in sugar, if desired.

Note to the nesting: You may want to try this on a cool day while not pregnant or you may find yourself trying to keep your sweat from dripping into the oil.


Sunday, August 19, 2012

another free-will review

FROGTAPE is my friend.

I love stripes.  Anyone who has seen my baby rooms knows that I love stripes.  Several years ago I was in a  Home Depot and saw a display for painter's masking tape called FrogTape.  The picture on the front was convincing enough. It showed cleaner paint lines. Even though it was more expensive than the 3M Blue Tape I'd been using for years, I thought I'd give it a try for my daughter's nursery. After pulling off the tape, I was instantly convinced. I'd been through years of using Blue Tape and always had to touch up the stripes I'd painted. FrogTape was a miracle! They were the cleanest lines I'd ever seen. That said, I recommend making sure your walls and trim are clean, free of dust and grease and that after you've painted, pull the tape off right away.  As with Blue Tape, it has a tendency to pull off extra paint if you wait more than a day.

I could talk about it all day long, but the proof is in the pictures.  I painted another room this weekend and after taping all the stripes, I ran out of FrogTape as I was taping off the trim.  I had a roll of Blue Tape in our stash and decided to use that for the rest of the wood trim so I could start painting.

Here's the difference in the same room, taped and painted at the same time:

3M Blue tape with "Edge Lock" technology:


FrogTape with "Paint Lock":

Need I say more?

USE FROGTAPE!!!

I've got some trim to go clean up now.


Friday, July 6, 2012

Raggedy Flip Flops


My sister sent me an idea of replacing the rubber tops of flip flops with fabric and knots and I liked the idea a lot, but I didn't know how they would hold up. I started experimenting with my daughters' new stash of $1 flip flops we bought last week. I let the girls pick out the fabric and the flip flops (with a bit of direction from mom). I borrowed the general idea from another source, but this finished product is my own experimentation.

You'll need:
4 long strips of fabric, flip flops, scissors and flip flop glue


 Tie tightly so the short end is toward the toes.

Wrapping the short end inside, wrap around over the top toward the inside all the way around until you get to the center. You may want to glue as you go for extra strength.


Repeat with other side.


Tie knot around the top center.


Tie a bow tightly and trim long ends of fabric.


 Glue knots in place at base and bow.

Just add feet.

Thanks, Julie!


Sunday, July 1, 2012

A Very Seussical Birthday

Stages Theater is one of my favorite places. One of the things I love about it, other than the fun and reasonably priced shows they put on for kids, is that they are an educational theater. They use as many children in their shows as they can and the kids get a true experience of hard work with fun, and get to work with some really great adults (like me, of course!)

I was thrilled when my daughter decided she would rather invite a handful of school friends to Stages' summer musical, Seussical instead of a having a big princess party. (It makes for a much more fun cake). It was almost too easy: get tickets, reserve an inexpensive room upstairs from the theater and I was done. I felt a little guilty that I was putting so little work into the party, but that would soon change.

Of course, the invitations needed a Seussical flair, so I went to work with my creative rhyming skills, which are lacking, but I would never admit that to you because I want you to think I'm amazing.

It was a little book:


The next step was figuring out the party favors. I didn't want to send home a bag of junkies that Moms will toss out when the kids aren't watching. I'm a big fan of consumables...crayons, gum, notepads, etc...anything that will eventually go away.  I decided to on something useful and consumable. I found a jpeg of the cat in the hat and designed a little iron on-transfer for some t-shirts I bought at JoAnn.  Then I added a giant lollipop or unicorn pop to thrill the kids. I would like to publicly apologize to the parents for the daily "mom, can I eat my sucker now?" that they will have to deal with.

The boys got gray.

Then on to the cake. I think I may have set the bar too high too early. My girls think I can do anything. Without batting an eye, the birthday girl decided that she wanted Horton, Sour Kangaroo, the Cat in the Hat and Things 1 & 2. Hey, no problem! I have all the time in the world to figure out how to do not just one character, but four. When I balked at it, she said, "Mom, you're really good at cakes. You can do it."

Yep, the bar is too high, and the little smarty pants knew just what to say to get it done. So, here it is.

She had to make sure there was the speck on the clover.


We all had a great time and I got to introduce a few kids to one of the happiest theaters in the Twin Cities.